Keying Static Variables

When you trade in RT using automated trading, you must make sure that your Static Variables are unique to your system, i.e. they should not be global. Global variables can be accessed from anywhere, and you must make sure that there are no naming conflicts when you run different programs simultaneously in different panes or windows. You can do this by Keying the Static Variable name with a unique string. While you could type in this unique key each time you use a Static Variable, a simpler way is to define a Global key that changes with the environment that the formula runs in.

An easy way to do this is to replace (wrap) the Amibroker StaticVariable functions with custom functions that have an “x” prefixed to the AmiBroker function name, such as: xStaticVarSet(). The advantage of using a simple name modification is that you can quickly convert the functions from one type to the other using the AFL editor’s Replace function.

The Static Variables in the code below are keyed with the Name() and ChartID and, in most cases, this works fine. However, you can also key Static Variables with only the Name(), the System’s filename, or other unique strings. How you key a Static Variable depends on the required scope of the Static Variable. For example, to make a Static Variable common to all tickers traded you need to remove the Name() part from the key. Below are four functions that you can substitute for the standard ones:

global SVKey;
SVKey Name()+NumToStr(GetChartID(),1.0,False);

procedure xStaticVarSetSNameSValue )
{
global SVKey;
InIndicator Status("Action") == 1;
if( InIndicator StaticVarSet(Sname+SVKeySvalue);
}

function xStaticVarGetSName )
{
global SVKey;
if( IsNull( Var = StaticVarGet(Sname+SVKey) ) ) Var = 0;;
return Var;
}

procedure xStaticVarSetTextSNameSValue )
{
global SVKey;
InIndicator Status("Action") == 1;
if( InIndicator StaticVarSetText(Sname+SVKeySvalue);
}

function xStaticVarGetTextSName )
{
global SVKey;
return StaticVarGetText(Sname+SVKey);
}

Edited by Al Venosa

Static Variables in RT Systems

Fact: Without the use of Static Variables you cannot develop an automated trading system.

AmiBroker executes your AFL programs one line at the time, top to bottom. Unlike most conventional programming languages, it doesn’t ever hang around and wait for events unless you specifically want to do this (not recommended). In addition, AFL never re-uses values assigned to variables during the previous pass through the code, i.e. all variables are re-initialized at each chart refresh. This means that unless you use Static Variables you can never assign a value to a variable and retain its value over any length of time or pass it from one refresh to the next. RT Trading requires you to save many variables, such as Signals, OrderIDs, Position and Order status, and Timing.

In the case of transient signals, such as when the price briefly crosses your limit price, a buy signal is generated, but it will disappear on the next pass through the code if the RT condition no longer exists. When this happens, an order is transmitted, but you have no record that this ever happened. Then, if the same event takes place again a few seconds later, you’ll get another buy signal and another order goes out. With these multiple orders being sent to the TWS, you’ll be broke before you know what hit you.

This is where Static Variables offer the solution you need: they maintain values of variables and arrays until you change them or until you shut down AmiBroker. They give you a means to carry forward values from one execution to the next. This is the key mechanism used to prevent multiple orders from going out; there is no other way to do this. Of course, you could always check your position size, but, due to various delays, your code could execute several times before your position change was even acknowledged. It is a risk not worth taking and simply wouldn’t work.

Without the use of Static Variables, you cannot develop an RT Automated Trading system. Reading up on them in the users’ manual and understanding how they work and are implemented in AFL will prove to be your best investment in time.

Edited by Al Venosa.

The Edge of Auto-Trading

Ten reasons you might want to Automate your Trades

  1. More fun. It is mesmerizing and great fun to see your orders being placed, modified, and filled faster than any human trader could ever do – and to do so error-free.
  2. Less stress. Trading under the pressure of a fast moving market may be very stressful. Having your system do all the work for you without order entry error drastically reduces stress.
  3. Simple User-Interface. For most of us, Interactive Brokers’ Trader Work Station (TWS) is bloated with goodies we never use and, sometimes, is awkward to use. AmiBroker allows you to design your personalized Trading Interface with only the functions you need. This means you can minimize the TWS, save screen space, and trade from your very own personalized Trading Interface.
  4. Greater efficiency. Whether you trade Intraday or end-of-day (EOD), manually calculating prices for many complex orders can be time-consuming. Using automation you can do all those calculations in real time and without any delays.
  5. Increased flexibility. You can make up your own order types, switch trading rules, set stop strategies, etc., and change them on the fly.
  6. Less emotional. We all know that emotional trading can kill even the best mechanical system. Your automated mechanical system will follow your trading rules flawlessly and automatically, never second-guessing mechanical signals.
  7. Increased responsiveness. Using automation, prices can be recalculated and orders modified, perhaps even executed, faster than the most efficient and fastest touch typist can enter them.
  8. Greater accuracy. No possibility of entry errors when ordering, ever!
  9. Trading Niche. While the popularity of automated trading is rising rapidly, there may still be a unique niche for the small trader using automation. The price excursions and volumes may be too small for fund traders but may be perfect for the small trader.
  10. Increased profitability. If you are trading a profitable mechanical system, adding automation to it will almost certainly increase your profits.

Edited by Al Venosa

DebugView: _TRACE() Statements and Logging

_Trace() Statements

If you use many debug statements, you can speed up your code by using conditional debug code (shown below), and you can control debug output with a ParamToggle() using _TRACE statements:

DBVOn = ParamToggle("DebugView","OFF|ON", 0);
if( DBVOn ) _TRACE( "# "+ YourDebuggingText );

To keep your main code short and simple, you can also wrap the _TRACE() statement into a similarly named custom TRACE() function that you would call instead of the _TRACE() (note the “_” has been removed):

function TRACE( DBVString )
{
global DBVOn;
if( DBVOn ) _TRACE( "# "+ YourDebuggingText );
}

You may find it handy to keep the debugging code in the system until it is fully functional or, if the minor speed penalty is no problem, turn it off and leave it there permanently. You can also create a custom library of debugging functions and make them available for use at any time by including them in your code using a #Include statement, which are stored in the folder C:\Program Files\AmiBroker\Formulas\Include. This path is defined in Tools/Preferences/AFL/Standard Include Path/Formulas/Include.

Logging

Using too many _TRACE() statements or allowing the DebugView output file grow too large will slow down AFL execution. To prevent the file from growing too large, it is a good idea to add a manual clear function so that you can clear it occasionally:

ClearDBV = ParamTrigger("Clear DebugView","CLEAR DBV");
if( ClearDBV ) _TRACE("# DBGVIEWCLEAR");

You can further reduce overhead by controlling the amount of logging detail. You do this by using a ParamList() whereby you can set the required logging level. For example, you might want to control debug statements inside and outside a loop separately. Below is a simple example that scans a Watchlist from your Indicator once every 5-seconds:

RequestTimedRefresh(5);
ClearDBV = ParamTrigger("Clear DebugView","CLEAR DBV");
if( ClearDBV ) _TRACE("# DBGVIEWCLEAR");
DBVLevel = ParamList("DBV Logging Level","NO LOGGING|SCAN TIME ONLY|SCAN TIME AND LOOP",0 );
DBVL1 = DBVLevel == "SCAN TIME ONLY";
DBVL2 = DBVLevel == "SCAN TIME AND LOOP";
scan = Status("redrawaction");
if( Scan )
{
if( DBVL1 OR DBVL2) _TRACE( "#1 Scan Triggered at "+Now(0) );
TickerList = ParamStr("Ticker List","AAPL,BRCM,CSCO,MXIM,GOOG");
for( i = 0; ( Ticker = StrExtract( TickerList, i ) ) != ""; i++ )
{
TickerPrice = GetRTDataForeign("Last",Ticker);
if( DBVL2 )
{
_TRACE( "#2 Scanning "+Ticker+", "+NumToStr(TickerPrice,1.2));
}
}
if( DBVL2 ) _TRACE("#"); // Skip a line in the log
}

Edited by Al Venosa

Wrapping Functions

During development of Automated Trading systems, “wrapping” functions (i.e., calling a standard function from a custom function) for the Interactive Brokers Controller (IBc) allows you to add debug statements to your code without making your main code difficult to read. Here is an example where the standard ibc.IsOrderPending() is wrapped by a custom afl function named IsOrderPending():

function IsOrderPending( ORderID )
{
global ibc;
IsPending = ibc.IsOrderPending( ORderID );
TRACE("# Pending Status for OrderID: " + ORderID + " is "+NumToStr(IsPending,1.0));
return IsPending;
}

Instead of calling the IBc function directly, you now call it from a function that is identically named but has the prefix ibc. removed. This allows you to attach debugging statements and utility code (such as managing OrderIDs) to your automated trading (AT) functions without increasing the length of your main code. All you have to do to restore full speed operation is to re-attach the ibc. to the wrapper function names. Other ibc. functions can be wrapped similarly.

Wrapping functions slow down AFL slightly, but the loss in speed is more than offset and justifiable by the lack of clutter in your main code with long _TRACE() statements.

Edited by Al Venosa

Plotting Trade-Lines

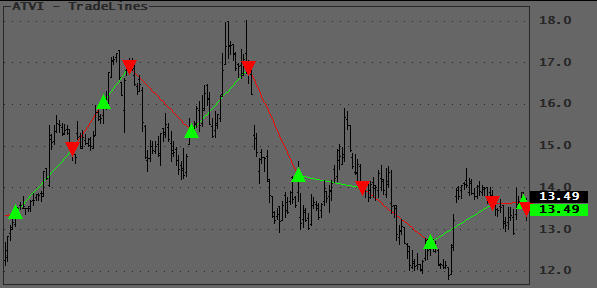
A useful application is to plot straight lines between entry- and exit-signals, giving you the ability to view at a glance the location and magnitude of profits and losses of your trading system. The LineArray() function enables you to draw straight lines from one event or condition to another. In the chart below, which shows a reversal trading system, note how the lines begin and end at the exact trade prices, green being long and red being short. This gives you a quick impression of the profitability and location of individual trades:

Chart with Trade-Lines

Other applications would be plotting of custom ZigZag lines, price channels, trendlines, breakouts, etc.

There are two afl versions listed below, since I believe many of us use the first method, I decided to show them both for educational purposes.

The first one shows how you should NOT plot LineArrays. This method calls Plot() repeatedly and plots each LineArray segment as it is calculated. This is very resource consuming (executes slow) and may trigger a Warning 502 when you display a lot of data. Do not use this version.

The second version shows how Tomasz (Thanks TJ!) combined the individual LineArray segments inside the loop and then plots them with a single Plot() statement outside the loop. This code executes much faster and will never trigger Warning 502. The technique is simple but shows a clever way to combine array segments. Study it :-) it will come in handy one day!

// This version is only listed to show you how it should NOT be programmed
// Dummy system to generate some signals
Buy CrossMACD(), Signal() );
BuyPrice Open;     // Substitute your own prices
Sell CrossSignal(), MACD() );
SellPrice Close;     // Substitute your own prices
PlotShapesIIfBuyshapeSmallUpTriangleshapeNone ), colorBrightGreen0BuyPrice);
PlotShapesIIfSellshapeSmallDownTriangleshapeNone ), colorRed0SellPrice);
PlotC""1128 );
// Plot the Trade Lines
Sig Buy OR Sell;
y0 0;
y1 C[0];
TPrice C;
FirstVisibleBar Status"FirstVisibleBar" );
Lastvisiblebar Status"LastVisibleBar" );

for ( Firstvisiblebar<= Lastvisiblebar AND BarCountb++ )
{
    if ( Buy[b] )
    {
        Co colorRed;
        TPrice[b] = BuyPrice[b];
    }

    if ( Sell[b] )
    {
        Co colorBrightGreen;
        TPrice[b] = SellPrice[b];
    }

    if ( Sig[b] )
    {
        x0 y0;
        x1 y1;
        y0 b;
        y1 TPrice[b];
        PlotLineArrayx0x1y0y1 ), ""Co);
    }
}
// Improved version
// Dummy system to generate some signals
Buy CrossMACD(), Signal() );
BuyPrice O// Substitute your own prices
Sell CrossSignal(), MACD() );
SellPrice C// Substitute your own prices
PlotShapesIIfBuyshapeUpTriangleshapeNone ), colorBrightGreen0BuyPrice);
PlotShapesIIfSellshapeDownTriangleshapeNone ), colorRed0SellPrice);
PlotC""1128 );

// Plot the Trade Lines
Sig Buy OR Sell;
y0 0;
y1 C[0];
FirstVisibleBar Status"FirstVisibleBar" );
Lastvisiblebar Status"LastVisibleBar" );
CombinedColor colorWhite;
CombinedLine Null;

for ( Firstvisiblebar<= Lastvisiblebar AND BarCountb++ )
{

    if ( Buy[b] )
    {
        Co colorRed;
        TPrice[b] = BuyPrice[b];
    }
    else if ( Sell[b] )
    {
        Co colorBrightGreen;
        TPrice[b] = SellPrice[b];
    }

    if ( Sig[b] )

    {

        x0 y0;

        x1 y1;

        y0 b;

        y1 TPrice[b];

        La LineArrayx0x1y0y1 );

        CombinedLine IIfIsNullla ), CombinedLinela );
        CombinedColor IIfIsNullLa ), CombinedColorCo );
    }
}

PlotCombinedLine""CombinedColor );

Edited by Al Venosa

« Previous Page