Testing your AB-IBc-TWS Communication

Besides demonstrating the basics of Automated Trading (AT), the code below may function as a diagnostic tool during AT code development. It often happens that things suddenly stop working, and no orders are transmitted. When this happens, and before you start looking for bugs in your code, you can run this code to verify that your interfacing to the TWS is functional.

For orders to be transmitted to the market you must have entered your “Unlock Code” for the IB Controller in the Unlock window that pops up when you click Files -> Enter Unlock Code. You can obtain your code electronically by following the link to the IBc User Agreement. When you have signed and submitted the User Agreement the Unlock Code will be emailed to you within seconds.

The test code below can be executed from an Indicator window and will test your AB->TWS connection by placing orders from the Param window to your eDemo or Paper Trading account:

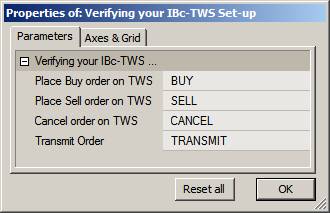
Order and TWS Status is displayed in the Title:

If you are using IB?s eDemo, orders may be processed slowly enough for you to observe how the orders are processed.

The code below illustrates several basic but very important aspects of Automated Trading, and it is important to fully understand this code before trying more complex programs. The most important concept to understand is that of the Order ID. The IBc returns a unique OrderID for each order placed. This OrderID can subsequently be used to modify, transmit, cancel, and get status for the order. For any AT system to function properly, OrderIDs must be tracked meticulously at all times. Using an expired OrderID, a non-existing one, or one for an order that is already filled, for example, will lead to API errors.

SetChartOptions2chartWrapTitle );
RequestTimedRefresh);
BuyOrderTrigger ParamTrigger"Place Buy order on TWS""BUY" );
SellOrderTrigger ParamTrigger"Place Sell order on TWS""SELL" );
CancelOrderTrigger ParamTrigger"Cancel order on TWS""CANCEL" );
TransmitTrigger ParamTrigger"Transmit Order""TRANSMIT" );
ibc GetTradingInterface"IB" );
OrderID StaticVarGetText"OrderID" );
ORderStatus ibc.GetStatusORderIDTrue );

if ( BuyOrderTrigger )
{
    OrderID ibc.ModifyOrderOrderIDName(), "Buy"100"MKT"00"Day"TransmitTrigger );
    StaticVarSetText"OrderID"OrderID );
}

if ( SellOrderTrigger )
{
    OrderID ibc.ModifyOrderOrderIDName(), "Sell"100"MKT"00"Day"TransmitTrigger );
    StaticVarSetText"OrderID"OrderID );
}
else
    if ( CancelOrderTrigger )
    {
        OrderID StaticVarGetText"OrderID" );
        ibc.CancelOrderORderID );
    }
    else
        if ( TransmitTrigger )
        {
            if ( ibc.IsOrderPendingORderID ) )
                ibc.TransmitORderID );
        }

OrderID StaticVarGetText"OrderID" );

LastTWSMsg ibc.getLastErrorORderID );
Title "\n" +
        "           OrderID: " ORderID "\n" +
        "Last TWS Error Msg: " LastTWSMsg "\n" +
        "Order Status at IB: " ORderStatus "\n" +
        " TWS Position Size: " NumToStribc.GetPositionSizeName() ), 1.0False );

Edited by Al Venosa

The Master AT switch

When you are using an Automated Trading system, you need a master switch to allow you to Enable/Disable all automated action. It is very important for this switch to be Off when you start AmiBroker because the last thing you want is to see is that orders are going out right after launching AmiBroker.

You cannot use the ParamToggle() because this function resumes the last state it was in before you closed AmiBroker, i.e. if it was Enabled when AmiBroker shut down, then it would be Enabled after startup. You need a function that always starts up Disabled, no matter under what condition AmiBroker closed.

To create a switch that is always Off at the time of startup, you use two ParamTrigger()s, one to turn On Automation and one to turn Off Automation.

AutoTrading nz(StaticVarGet("AutoTrading"));<p>ATonTrigger ParamTrigger("Start AutoTrading","START");<p>AToffTrigger ParamTrigger("Stop AutoTrading","STOP");<p>if( ATonTrigger )StaticVarSet("AutoTrading",1);<p>else if( AToffTrigger )StaticVarSet("AutoTrading",0);<p>AutoTrading StaticVarGet("AutoTrading");<p>Title "\nAutoTrading "+WriteIfAutoTrading"On","Off");<p>

Edited by Al Venosa

Setting up your TWS for Automatic Trading

This is a Quick-Start introduction to setting up your default settings in the TWS simulator and/or the actual TWS for automatic trading. Please refer to the official TWS documentation for more information on this and related topics.

For AmiBroker and the IBc to communicate with the TWS, you have to configure the TWS as follows:

Trader Workstation Configuration

In some of the later topics, you will learn about the TWS export file, which is read to obtain the actual prices at which your orders were filled. For this feature to work properly, you have to configure your TWS with the naming conventions shown below.

TWS Auto Export setup

The Export filenames are different for each IB account you use, and they are saved on your hard drive at the paths shown below:

Real.Trades. This filename is for your real-money trading account (C:\jts\Real.Trades).

Simulated.Trades. This filename is for your Simulated (Paper-Trader) account (C:\jts/Simulated.Trades).

Demo.Trades. This filename is for the eDemo account (C:\jts\Demo.Trades).

Be aware that exported trade lists are not date-stamped and will be overwritten the next day you trade.

Edited by Al Venosa

The Edge of Auto-Trading

Ten reasons you might want to Automate your Trades

  1. More fun. It is mesmerizing and great fun to see your orders being placed, modified, and filled faster than any human trader could ever do – and to do so error-free.
  2. Less stress. Trading under the pressure of a fast moving market may be very stressful. Having your system do all the work for you without order entry error drastically reduces stress.
  3. Simple User-Interface. For most of us, Interactive Brokers’ Trader Work Station (TWS) is bloated with goodies we never use and, sometimes, is awkward to use. AmiBroker allows you to design your personalized Trading Interface with only the functions you need. This means you can minimize the TWS, save screen space, and trade from your very own personalized Trading Interface.
  4. Greater efficiency. Whether you trade Intraday or end-of-day (EOD), manually calculating prices for many complex orders can be time-consuming. Using automation you can do all those calculations in real time and without any delays.
  5. Increased flexibility. You can make up your own order types, switch trading rules, set stop strategies, etc., and change them on the fly.
  6. Less emotional. We all know that emotional trading can kill even the best mechanical system. Your automated mechanical system will follow your trading rules flawlessly and automatically, never second-guessing mechanical signals.
  7. Increased responsiveness. Using automation, prices can be recalculated and orders modified, perhaps even executed, faster than the most efficient and fastest touch typist can enter them.
  8. Greater accuracy. No possibility of entry errors when ordering, ever!
  9. Trading Niche. While the popularity of automated trading is rising rapidly, there may still be a unique niche for the small trader using automation. The price excursions and volumes may be too small for fund traders but may be perfect for the small trader.
  10. Increased profitability. If you are trading a profitable mechanical system, adding automation to it will almost certainly increase your profits.

Edited by Al Venosa