March 6, 2008
Introduction to Real-Time Control-Panels
IMPORTANT NOTES:
1) Posts in this category are published as code is developed and you should use the most recent version posted. This code is shared without extensive field testing and may contain errors or function different than you expect. Always verify that the code does what you want it to do before using it in a real application. This publishing method is used to give you a chance to use it at the current stage of development, else you would have to wait until all functions are completed – and that time might never come :-)
2) All code on the UKB takes advantage of the latest AFL functions. If you encounter problems, and before posting questions, please verify that you are running the latest AmiBroker beta software. New releases are usually announced in the AmiBroker Development Log. The code you find here is modified too frequently to add/maintain version() statements to/in all programs published.
3) The code covered in this series of posts make extensive use of GFX functions please read the posts in the GFX Programming category.
==========
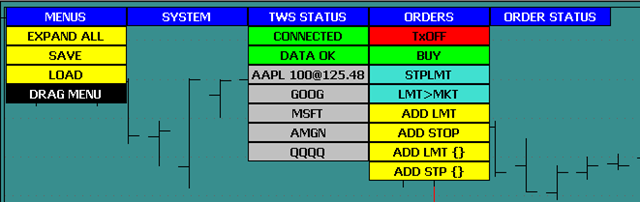
In Real-Time trading it is handy to use "Control Panels". Control Panels are custom button layouts that can be used to change system settings, and give Real-Time visual feedback on the state of the system. Clicking any of the buttons lets you execute specific code with a single mouse click. While the AmiBroker Parameter window is very useful for use with Indicators it lacks important features needed in Real-Time. Posts in this category will cover the development of a custom menu system for use in Real-Time applications. It will offer: relocatable and collapsible menus, dynamic coloring, multi-state toggles, dynamic labels, sizable buttons and fonts, status indicators, unlimited menu columns, etc. Of course you can conceive and add your own special functions. The main code can be placed in an Include file and menus and buttons can be added to your code with statements somewhat similar to the AmiBroker Param(). The code below generates the first column for the test menu shown in the image below the code.
Menu_Begin( "MENUS", ButtonHeight, ButtonWidth, MenuXoffset, MenuYoffset );
MenuMinimized = MenuHeader( BLU, WHT);
ExpandAll = MenuTrigger( "EXPAND ALL", ColorTrigger, ColorTriggerOn, BLK );
SaveMenus = MenuTrigger( "SAVE", ColorTrigger, ColorTriggerOn, BLK );
LoadMenus = MenuTrigger( "LOAD", ColorTrigger, ColorTriggerOn, BLK );
MovingMenu = ButtonRotate( "MOVING,DRAG MENU", "4,1", "7,2");
Menu_End();</p>
A Rotate button changes state with each click. It can function as a ParamToggle() but can also be used to rotate through multiple states like Buy, Sell, Short, and Cover just by clicking the button multiple times. Each click can change the Button label and color. Here is a typical menu layout:

Menus can be collapsed by Double-Clicking on any of the Blue headers. This means you can uncover hidden chart sections instantly, without having to move the menu block. In its collapsed state the menu looks like this:

You can also collapse individual menus with a single click on the blue header, as shown below.
Posts in this series will progress through various prerequisites and building blocks to help you design your own menu layout.
 Filed by Herman at 11:56 am under Real-Time Control-Panels
Comments Off on Introduction to Real-Time Control-Panels