Zoom-to-Range Applications

This post offers a variety of zoom functions to help you analyze charts better. For example, you can zoom in on the cursor-selected bar, or you can step forward and backward from signal to signal or over custom price conditions. These functions are made possible by the ZoomToRange OLE function, which lets you zoom in on a specific date range.

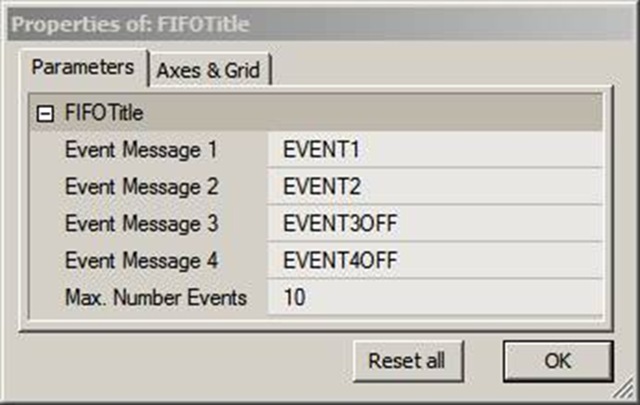
To exercise and test the functions below, copy and Insert the code to an Indicator pane, open the Param window, and click on various options to see how the functions work. For demo purposes, three zoom events are provided: Buy, Sell, and Mondays. In your own application, you would assign other conditions to the event variable, such as, for example, gaps, price patterns, etc. Stepping from Event to Event would allow you to visually analyze the chart surrounding events. The Param window looks like this:

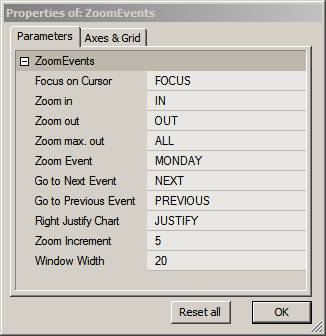
Zoom Increment is the number of bars added to the display with each zoom in/out action. WindowWidth is the number of bars displayed when jumping from event to event.
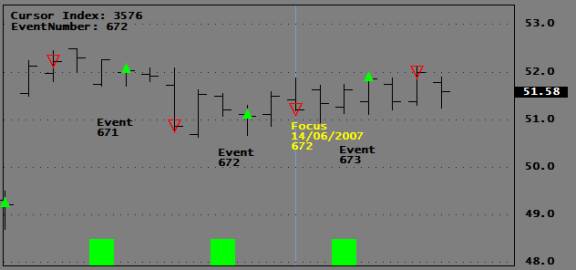
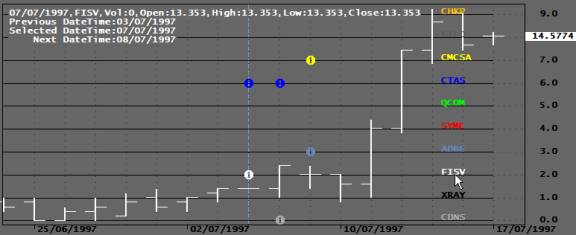
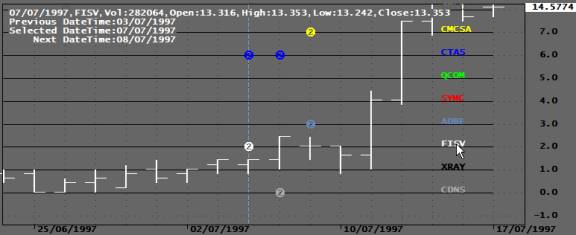
The program uses a FocusBar to which zoom dimensions are referenced. Yellow text is attached to the FocusBar on the chart to identify it. You can add other information to this PlotText(). For example, if you were analyzing buy, sell, short, and cover signals, you could add trade prices and indicator values, if you so desired. The Green histogram at the bottom of the chart indicates where the selected events occur. See an example chart below showing buy signals. The green histogram bar occurs just before the green buy arrow on the chart.

Descriptions for the function below are presented ahead of the functions themselves so that you can copy all the code in one step.

ZoomToIndex( FirstBarIndex, LastBarIndex)
Calling the ZoomToIndex() will zoom your chart to display a window ranging from the first argument (FirstBarIndex) to the second argument (LastBarIndex). While you cannot zoom in closer than ten bars using the Zoom In/Out buttons on your AB Toolbar, this function lets you zoom all the way down to a two-bar window. Since most Indicators use periods expressed in bars and not in dates, the function uses the BarIndex to set the window width.

ZoomToCursor( ZoomWidth )
This function lets you zoom in to the cursor position and display the number of bars assigned to ZoomWidth. The values of important variables are displayed in the chart Title for educational purposes.

ZoomOut( ZoomWidth )
This function zooms out by increasing the number of bars displayed by ZoomWidth bars.

ZoomIn( ZoomWidth )
This function zooms in by reducing the number of bars displayed by ZoomWidth bars.

ZoomToNext( Event, ZoomWidth )
This function lets you jump to the next occurrence of a TRUE value in the Event Array. It also focuses on the event with a window of ZoomWidth bars. The most important application for this function would probably be to analyze trades by stepping from signal to signal and to visually inspect custom events or price patterns.

ZoomToPrev( Event, ZoomWidth )

This function is similar to the one above, but it jumps (retreats) to the previous event.

MarkFocus()
This function places the Yellow text at the FocusBar. You may want to customize the text displayed.

ZoomAllOut()
This function zooms out to display all bars in the database.

RightJustifyChart
When trading Real-Time, your signals are generated by prices from the Last Bar whether this bar is visible or not. If, during intense trading, you miss the fact that your Chart is not fully right justified, you may see and hear orders going out while no actions show on your Chart. While such confusion usually doesn’t last long, it could delay discretionary trades and even trick you into thinking there may be a coding problem, causing you to initiate debugging code. This function right-justifies your chart, and if it is triggered at the start of your session, it will prevent you from working with a shifted chart.

procedure ZoomToIndexFirstBarIndexLastBarIndex)
{
StaticVarSet("FirstBarIndex",FirstBarIndex);
StaticVarSet("LastBarIndex",LastBarIndex);
DT DateTime();
BI BarIndex();
LastDateTime LastValue(ValueWhenLastBarIndex == BIDT ));
FirstDateTime LastValue(ValueWhenFirstBarIndex == BIDT ));
LastDateTimestr DateTimeToStrLastDateTime );
FirstDateTimestr DateTimeToStrFirstDateTime );
AB CreateObject("Broker.Application");
AW AB.ActiveWindow;
AW.ZoomToRangeFirstDateTimestrLastDateTimestr );
} 
procedure ZoomToCursorZoomWidth )
{
local ZoomWidth;
BI BarIndex();
SBI SelectedValue(BI);
LBI LastValue(BI);
CursorIndexNz(StaticVarGet("CursorIndex"));
FirstBarIndex Max(0,SBI ZoomWidth);
LastBarIndex MinLBISBI ZoomWidth );
ZoomToIndexFirstBarIndexLastBarIndex);
} 
procedure ZoomOutZoomWidth )
{
local ZoomWidth;
BI BarIndex();
LBI LastValue(BI);
LastVisiblebar Status("LastVisibleBar");
FirstVisibleBarStatus("FirstVisibleBar");
FirstBarIndex Max0FirstVisibleBar ZoomWidth);
LastBarIndex MinLBILastVisibleBar ZoomWidth );
ZoomToIndexFirstBarIndexLastBarIndex);
} 
procedure ZoomInZoomWidth )
{
local ZoomWidth;
_TRACE("##");
BI BarIndex();
LBI LastValue(BI);
LastVisiblebar Status("LastVisibleBar");
FirstVisibleBarStatus("FirstVisibleBar");
FirstBarIndex Max0FirstVisibleBar ZoomWidth);
LastBarIndex MinLBILastVisibleBar ZoomWidth );
ZoomToIndexFirstBarIndexLastBarIndex);
} 
procedure ZoomToNextEventZoomWidth )
{
local EventZoomwidth;
EventNum Cum(Event);
BI BarIndex();
LBI LastValue(BI);
DT=DateTime();
NextEventNum Min(Nz(StaticVarGet("EventNumber"))+1LastValue(EventNum));
NextEventIndex LastValue(ValueWhen(EventNum == NextEventNumBI));
StaticVarSet("EventNumber",Max(1NextEventNum));
FirstBarIndex Max0NextEventIndex ZoomWidth );
LastBarIndex MinBarCount-1NextEventIndex ZoomWidth);
ZoomToIndexFirstBarIndexLastBarIndex);
StaticVarSet("FocusIndex",NextEventIndex);
} 
procedure ZoomToPrev(  EventZoomWidth )
{
local EventZoomwidth;
EventNum Cum(Event);
BI BarIndex();
LBI LastValue(BI);
LastEventNum LastValue(EventNum);
NextEventNum Max(1,Nz(StaticVarGet("EventNumber"))-1);
NextEventIndex LastValue(ValueWhen(EventNum == NextEventNumBI,1));
StaticVarSet("EventNumber",NextEventNum);
FirstBarIndex Max0NextEventIndex ZoomWidth );
LastBarIndex MinBarCount-1NextEventIndex ZoomWidth);
ZoomToIndexFirstBarIndexLastBarIndex);
StaticVarSet("FocusIndex",NextEventIndex);
} 
procedure MarkFocus()
{
global EventNum;
DT=DateTime();
BI BarIndex();
LBI LastValue(BI);
FirstBarIndex Nz(StaticVarGet("FirstBarIndex"));
FocusIndex Min(LBI,Nz(StaticVarGet("FocusIndex"))+1);
FocusDateStr NumToStr(DT[FocusIndex],formatDateTime);
ENStr NumToStr(EventNum[FocusIndex],1.0,False);
PlotText("\n\nFocus\n"+FocusDateStr+"\n"+ENStr,FocusIndex,C[FocusIndex],colorYellow);
} 
procedure ZoomAllOut()
{
BI BarIndex();
LBI LastValue(BI);
FirstBarIndex 0;
LastBarIndex LBI;
ZoomToIndexFirstBarIndexLastBarIndex);
} 
procedure RightJustifyChartChartWidth )
{
DT DateTime();
BI BarIndex();
FirstDateTime LastValueNz(RefDT,-Max(2ChartWidth) ) ) );
FirstDateTimestr DateTimeToStrFirstDateTime );
LastDateTimestr DateTimeToStrLastValue(DT) );
AB CreateObject("Broker.Application");
AW AB.ActiveWindow;
AW.ZoomToRangeFirstDateTimestrLastDateTimestr );
} 
SetBarsRequired(1000000,1000000);
GraphXSpace 20;
_SECTION_BEGIN("ZOOM");
FocusTriggerParamTrigger("Focus on Cursor","FOCUS");// zoom out by ZoomIncrement
ZoomInTriggerParamTrigger("Zoom in","IN");// zoom in by ZoomIncrement
ZoomOutTriggerParamTrigger("Zoom out","OUT");// zoom in by ZoomIncrement
ZoomAllTrigger ParamTrigger("Zoom max. out","ALL");// zoom out to all bars
ZoomPrevTriggerParamTrigger("Go to Next Event","NEXT");// Jump to next event
ZoomNextTriggerParamTrigger("Go to Previous Event","PREVIOUS");// Jump to previous event
RJTriggerParamTrigger("Right Justify Chart","JUSTIFY");
ZoomIncrementParam("Zoom Increment",10,1,1000,2);
ZoomWidthParam("Window Width",20,2,1000,1);
_SECTION_END();
_SECTION_BEGIN("TEST SIGNALS");
ZoomEventParamList("Zoom Event","MONDAY|RSI-BUY|RSI-SELL|TARGET",1);// Test events
ProfitTargetParam("Profit Target",0.1,0,2,0.01);// Profit target
_SECTION_END(); 

PrevZoomWidthNz(StaticVarGet("ZoomWidth"));
ZoomChangePrevZoomWidth != ZoomWidthStaticVarSet("ZoomWidth",ZoomWidth); 

ZoomAction FocusTrigger OR ZoomOutTrigger OR ZoomAllTrigger OR ZoomNextTrigger OR ZoomPrevTrigger OR ZoomChange OR ZoomInTrigger OR RJTrigger; 

if( ZoomEvent == "MONDAY" Event DayOfWeek() == 1;
else if( ZoomEvent == "RSI-BUY" ) 
{ 
Event Cross(30,RSI());// Buy rule to investigate
PlotShapes(IIf(Event,shapeSmallUpTriangleshapeNone),5,0,C,0);
Sell 0; 
}
else if( ZoomEvent == "RSI-SELL" ) 
{ 
Event Cross(RSI(),70);// sell rule to investigate 
PlotShapes(IIf(Event,shapeHollowDownTriangleshapeNone),4,0,C,0);
Buy 0; 
}
else if( Zoomevent == "TARGET" ) 
{
Target Ref(C,1) - C;// Profit target to analyze
Event Target ProfitTarget;
PlotShapes(IIf(Event,shapeSmallUpTriangleshapeNone),5,0,C,0);
}
else Event 0Plot(C,"",1,128);
EventNum Cum(Event);
FVBI Status("FirstVisibleBarIndex");
LVBI Status("LastVisibleBarIndex");
BI BarIndex();
SBI SelectedValue(BI);
LBI LastValue(BI); 

FirstVisibleBar Status"FirstVisibleBar" );
Lastvisiblebar Status("LastVisibleBar");
for( FirstvisiblebarLastvisiblebar AND BarCountb++)
{
if( Event[b] ) PlotText("\n\n\n\nEvent\n"+NumToStr(EventNum[b],1.0,False),b,L[b],1);
} 

if( GetCursorMouseButtons() == ) 
{
StaticVarSet("CursorIndex",SBI);
EventNum Cum(Event);
StaticVarSet("EventNumber",SelectedValue(EventNum));
StaticVarSet("FocusIndex",SBI-1);
}
CursorIndexNz(StaticVarGet("CursorIndex")); 

if( ZoomAction )
{
CurrentRangeLastVisiblebar-FirstVisibleBar;
VisibleCenterint((LastVisibleBar FirstVisibleBar)/2);
PrevEventIndex LastValue(ValueWhen(Event,BI,1));
NextEventIndex LastValue(ValueWhen(Event,BI,-1));
FirstBarIndex Nz(StaticVarGet("FirstBarIndex"));
LastBarIndex Nz(StaticVarGet("LastBarIndex")); 

if( FocusTriggerZoomToCursorZoomWidth );
else if( ZoomInTrigger ZoomInZoomWidth );
else if( ZoomOutTrigger ZoomOutZoomWidth );
else if( ZoomNextTrigger ZoomToPrevEventZoomWidth );
else if( ZoomPrevTrigger ZoomToNextEventZoomWidth );
else if( ZoomAllTrigger ZoomAllOut();
else if( RJTrigger RightJustifyChartZoomWidth );
} 

MArkFocus(); 

Plot(Event,"",5,styleArea|styleOwnScale|styleNoLabel,0,10);
CursorIndex StaticVarGet("CursorIndex");
EventNumberStaticVarGet("EventNumber");
Title "\n"+
"Cursor Index: "+NumToStr(CursorIndex,1.0,False)+"\n"+
"EventNumber: "+NumToStr(EventNumber,1.0,False)+"\n";

Edited by Al Venosa

RT vs EOD Trading

When migrating from end-of-day (EOD) to Real-Time (RT) trading, you will stumble upon many surprises, some beneficial and some that will be difficult to overcome. Trading is a very personal activity, and traders differ extensively on how they perceive the critical factors for success. The list below highlights a few areas where you should expect differences from your EOD experience.

1. Appearance of Bars. When you reduce the chart’s Time Frame (TF), the appearance of price-bars changes drastically. For example, in EOD you will rarely find sequential bars with unchanged prices; in the minute time frame, however, this may happen surprisingly often. Reducing the TF to 5 seconds exacerbates the problem even more. Many bars may be simple flat, horizontal lines where the OHLC prices are all equal. This could cause your indicators to drift and generate misleading signals. In addition, as you reduce the TF, the share volume may decline to the point where a bar might only represent a single trade, making it extremely difficult to get a fill at its price.

2. Data Padding. If you trade portfolios and use Foreign() the data you see may have been aligned and padded to your currently selected symbol (see: Automatic Analysis/Settings/check Pad and align all data to reference symbol). In this case the bar-prices you see are not real, have no volume and, of course, cannot be traded.

3. Gaps. When Indicators are used in RT, they do not correct for overnight gaps and intraday no-trading periods, which could cause problems with system performance.

4. Open vs. Close. In RT trading, the previous close is often equal or nearly equal to the current open since they are just one quote apart, while in EOD the entire trading system may be based on the difference between the previous closing price and the current open price.

5. Internet Delays. Internet delays impose much more significant effects in RT compared to EOD. The shorter time frames preclude speedy responses to price changes. Consequently, you will need to anticipate them and ensure your orders are placed if and when the expected move takes place.

6. Volume. Volume is a much more critical factor in RT trading. Many price changes cannot be traded because they might have resulted from just a single trade, which means that in these cases someone got filled before you did!

7. Commissions. When taking more frequent but smaller profits, which is a typical characteristic of RT trading, commissions play a larger role on performance. This means that the percentage of winning trades becomes more important than in EOD trading.

8. Order Execution. Efficient order placement is crucial to success in RT trading. Contrary to EOD trading, experiencing a few seconds or minutes delay can kill your system. Manually calculating order prices in RT becomes difficult if not impossible.

9. Data flaws. RT Data may arrive out of sequence, contain errors, and be corrected at a later time by the data provider. This means that after an EOD Backfill, your bars may look different. This often leads to highly misleading and overly optimistic profit performance by the backtester.

10. OHLC-Timing. In EOD, Open prices occur at the start of the daily-bar interval and Close Prices appear at the end of the bar. In real time (RT), however, the Open may precede the Close by just a fraction of a second, and the actual quotes might have arrived anywhere during the bar?s interval. This can become a problem when your system is timed by your system’s clock. For example, whereas the Backtester may easily enter a trade at the Open and exit at the Close on the same bar, you may not have enough time for this to occur in RT.

11. Data Stability. EOD data are stable, i.e., the OHLC prices never change once the bar has completed. For example, if your system triggers a Short signal when the High price crosses your LMT price, this signal can never disappear. Using RT data, however, the only price that remains stable for the duration of the bar is the Open price, while the HLC prices will constantly change until after the close of the trading bar. Barring data errors, the High and Low prices, by definition, can only go higher or lower, respectively, and cannot retrace to earlier values. However, the Close price will vary throughout the bar duration and may result in multiple signals when it crosses your LMT price multiple times. So, you should exercise care when developing entry or exit signals based on the closing price relative to other prices.

12. Trend Sensitivity. An EOD Trend-Following system is an example of a trend-sensitive trading system. Because RT trades are often much shorter in duration, RT trades have greater trend immunity because the trending component of stock prices diminishes at shorter time frames.

13. Breakouts. In smaller time-frames, RT Breakout systems will seldom give you your breakout price, and slippage will be proportionally greater as you reduce the timeframe. This is because the price tends to jump over your threshold and fill at a worse price.

14. Static Variables. You need to use Static Variables to carry system data from one pass to the next. There is simply no other way to pass parameters from one AFL execution to the next.

15. Random Price Movements. Price movements are subject to random price fluctuations introduced by slow trader response and Internet delays. Such changes are negligible in EOD trading, but as you work with shorter time frames in RT trading, you will gradually start trading basic price volatility that has very little to do with the direction of the market.

16. Sequential Processing. In EOD programming, tasks are usually completed within one pass through the code. However, in RT, programming tasks are completed in many small steps spread out over multiple bars, each step dependent on whether an RT external condition is met.

Edited by Al Venosa

Internet Connections

Questions on this topic are frequently asked on the AmiBroker forums. If you have practical know-how in this area please consider sharing your experience in a brief tutorial.

Your Trader Workstation

Questions on this topic are frequently asked on the AmiBroker forums. If you have practical know-how in this area please consider sharing your experience in a brief tutorial.

Data Holes in Real-Time Trading

When AmiBroker doesn?t receive data during regular trading hours, the missing period or bar is referred to as a Hole in the data array. Holes can occur when a ticker isn?t trading or when the data feed is interrupted. They can last for any length of time and can occur in any timeframe.

When a bar has no data, the bar is not added to the database. The database record simply skips to the next bar-period. Holes may be filled in during backfill or when the data provider transmits data corrections. When this happens, the database is updated.

When plotting Indicators based on the selected current symbol, holes are skipped to create continuous looking charts. Because of this you cannot visually detect any holes. However, as will be explained below, this is not the case when plotting foreign data.

While AmiBroker never modifies the data it collects and stores in your database, it may fill in and fix holes during operations that require a common time base. Such operations would include several AA functions, the creation of composites, and chart overlays. The process of fixing and padding data to allow these operations is called data alignment.

Data Alignment in the AA

In Automatic Analyzer (AA) operations, data Alignment can be turned On/Off and the Reference Symbol to be used for alignment can be specified. This is explained in the AFL Function Reference quoted below:

?Pad and align to reference symbol

When this is turned on, all symbols’ quotes are padded and aligned to reference symbol. Note: by default this setting is OFF. Use responsibly. It may slow down backtest/exploration/scan and introduce some slight changes to indicator values when your data has holes and holes are filled with previous bar data. The feature is intended to be used when your system uses general market timing (generates global signals based on data and/or indicators calculated using Foreign from ‘reference’ symbol) or when you are creating composites out of unaligned data. Note: if reference symbol does not exist, data won’t be padded.?

Data alignment in Indicators

Foreign data used in Indicator formulas are aligned to the current symbol and not, as is the case in the AA, to the Reference symbol specified in the AA Settings. Depending on the value of the fixup parameter of the Foreign() function, data holes can be handled in any of three ways. This is explained in the AFL Function Reference as follows:

?The last parameter – fixup – accepts following values

  • 0 – the holes are not fixed
  • 1 – default value – missing data bar OHLC fields are filled using previous bar Close, and volume is set to zero.
  • 2 – (old pre-4.90 behaviour) – causes filling the holes in the data with previous O, H, L, C, V values

The fixup parameter of 2 is provided to maintain compatibility with earlier AmiBroker releases and should not be used when developing new code.?

Holes in Real-Time Portfolio-Trading

When executing an RT portfolio trading system from an Indicator window, you typically loop through the portfolio tickers and use the Foreign() function to access data for each ticker as it is selected. Since both the current and the foreign tickers may have holes, there are a variety of hole conditions to deal with. Holes and padded bars may appear and disappear from your chart depending on the value of the fixup parameter and whether the current or foreign ticker has holes. Charts may also change during RT backfills. Since the plotted data are the same data used in your formulas, you have to be cautious about how you use foreign data.

The criteria to detect holes are simple: if the Volume equals null, the data are missing (hole); if the Volume equals zero, the data are padded (filled hole); and if the Volume is greater than zero, the data are true (no hole).

Since foreign data are aligned to the current ticker in Indicators, it can be stated that:

? If the current ticker has no data for a particular bar, the corresponding bar-interval for the foreign array will not be displayed and will not be available for calculations. This blocks foreign data and could result in missed signals.

? If the foreign ticker has no data for a particular bar while the corresponding bar for the current ticker has data, a bar will be added to the foreign array. If fixup is turned On, this bar will be filled with prices from the previous foreign bar. If you use Intraday signals, this could result in extra or duplicate signals.

It is obvious from the above that to design a robust High-Frequency Real-time portfolio trading system that executes in the Indicator window, you must consider the effect of holes on your signals.

Detecting Holes

To detect all holes perfectly, you need a perfect reference ticker, i.e., one that trades every minute of the day for every trading day of the year. If such a perfect ticker existed, you would make this your current ticker so that all foreign data would be aligned to it. Simply checking for zero volume would identify all holes. However, since such a perfect ticker does not exist in reality, if you assume that a ticker is perfect, you are simply transferring the hole problem from one ticker to another, and you wouldn’t be any closer to solving the problem.

A perfect solution would be to use a linear Date Reference Array that has bars for all calendar days. Such an array is documented in the post titled ?Date Calculations? on this site. To apply a linear Date Reference Array to detect holes is beyond the scope of this post, but it may be covered in a later post.

Another reasonably good solution is to use a high volume ticker, like the QQQQ, for your current ticker. The problem is that even the QQQQ has low volume periods and may contain holes.

A slightly better solution is to create a Volume composite for a group of actively traded tickers, perhaps from different markets, and make it your current symbol. For this composite to have a Hole there would have to be a period during which none of the tickers traded. While this is unlikely to happen in longer time frames, it can still happen in very short time frames, making this solution imperfect also. This solution will be used here to create a chart that displays (maps) the existence of holes for an entire WatchList all at once.

The demo code below uses a separate WatchList for the composite and the tickers to be mapped. To prevent a slow response (perceived as lockup by many) when large numbers of tickers are mapped, or when you inadvertently select a very large WatchList, you can set a maximum number of tickers (defaults to 50). You should only use high volume tickers for the composite WatchList since lightly traded tickers are unlikely to add any bars to the composite.

Program Parameters

The Param window for the demo code has the following options:

The Reference Watchlist (0-based) should point to the group of tickers used to create the composite. You should always click UPDATE after changing the Reference Watchlist to create a new composite for the new Watchlist.

The Watchlist to Map selects the watchlist to be tested for holes. Each ticker in this watchlist will add a horizontal line to the chart. This would normally be your portfolio watchlist. Holes are indicated using a digit surrounded by a small circle. The digit is the fixup parameter used in the Foreign() to retrieve that data.

The occurrence of any digit shows the location of a hole. A 0 digit means the bar is Null or Empty, and no bar will show; a digit of 1 means that the bar was padded with only the C price from the previous bar; a digit of 2 means the data was padded with OHLCV (obsolete method!) data from the previous bar.

You can observe how holes are replaced with data from the previous bar. An empty bar is replaced with a bar identical to the preceding bar when you vary the fixup parameter in the Param window.

To demonstrate how a different Reference ticker changes the distribution of holes, you can open your workspace and step through (make current) different tickers in your database. The program checks the cursor position, and if you set Cursor-Selected Chart to SHOW (rather than HIDE), a price chart will be overlain on the chart for the selected ticker line. This allows you to zoom in and inspect prices in the immediate area surrounding the Hole or Padded data.

Note: Since there is no way to detect which pane the cursor is on, the cursor-position sensing will work only if the hole map is run in its own window.

Typical Hole-Maps

I the captures below, a NASDAQ 100 (N100) composite was used as reference for the ticker FISV. Each ticker in the chart (hole-map) below is assigned a horizontal time line on which the existence of holes is indicated with a small circle. Placing your cursor on a hole displays its date and data in the title. The color of the circles matches that of the ticker. The Y-axis numbers are the ticker numbers (redundant).

In the first case, the fixup parameter was set to zero and the bar location with missing bar is left empty (see cursor location). Because the digit is so small it may look like a ?1?, but it is actually a ?0?. The fact that a bar is missing means that the current symbol had data for this bar but the foreign ticker did NOT.

Fixup mode ‘0’

In the next capture a fixup parameter of 1 is used, and the missing bar is filled with the C price from the previous bar while the Volume (not shown) is set to zero.

Fixup mode ‘1’

In the next capture, the fixup parameter is set to 2, which results in the missing bar being Filled with OHLCV values from the previous bar.

Fixup mode ‘2’

In all the above examples, an EOD chart was used. However, it could just as well have been a 1-minute chart (or any other timeframe). Here is the code that produced the above charts:

RequestTimedRefresh(1);
GraphZOrder=True;
GraphXSpace 10;
RefWLNum Param("Reference WatchList",0,0,64,1);
MapWLNum Param("WatchList to Map",8,0,64,1);
ScanTrigger ParamTrigger("Reference Composite","CREATE COMP");
ShowChart ParamToggle("Cursor-Selected Chart","HIDE|SHOW");
FixupSelection ParamList("Fille Type (Fixup)","NO FIXUP (0)|PREVIOUS C to OHL (1)|PREVIOUS OHLCV (2)");
TMax Param("Max. Number Tickers Scanned",50,1,200,1);
if( FixupSelection == "NO FIXUP (0)" FixupFlag 0;
else if( FixupSelection == "PREVIOUS C to OHL (1)" FixupFlag 1;
else if( FixupSelection == "PREVIOUS OHLCV (2)" FixupFlag 2;
MapTickers CategoryGetSymbols(categoryWatchlist,MapWLNum);
FirstVisibleBar Status("FirstVisibleBar");
Lastvisiblebar Status("LastVisibleBar");
XText Lastvisiblebar-(Lastvisiblebar-FirstVisibleBar)/10;
if( ScanTrigger )
{
RefTickers=CategoryGetSymbols(categoryWatchlist,RefWLNum);
for( T=0; (symbol=StrExtract(RefTickers,T))!="" AND &ltTmaxT++ )
{
Vt=Nz(Foreign(Symbol,"V",False))>0;
AddToComposite(VT,"~MarketVolume","V",1|2|128);
}
}
else
{
for( T=0; (symbol=StrExtract(MapTickers,T))!=""T++ )
{
VT1Foreign(symbol,"V",FixupFlag);
F0 IsNull(VT1);
F1 VT1 == 0;
F2 VT1 == Ref(VT1,-1);
VT Nz(VT1);
if(T>15Co int(T/15)*15; else Co T;
Plot(T,"",colorBlack,styleLine|styleNoLabel);
PlotShapes(IIf(F0,shapeDigit0,IIf(F1,shapeDigit1,IIf(F2,shapeDigit2,shapeNone))),Co,0,T,0);
PlotText(""+symbol,XText,T,Co);
}
}
DT=DateTime();
TickerNumber=round(GetCursorYPosition());
SelectedTicker=StrExtract(MapTickers,TickerNumber);
DateTimeNum=GetCursorXPosition();
if(TickerNumber>15)Co=TickerNumber-int(TickerNumber/15)*15;else Co=TickerNumber;
SetForeign(SelectedTicker,FixupFlag);
if(ShowChartPlot(C,"",Co,styleBar|styleOwnScale|styleThick);
if( SelectedTicker == "" SelectedTicker Name();
Title="\n"+EncodeColor(Co)+
NumToStr(SelectedValue(DT),formatDateTime)+","+SelectedTicker+",Vol:"+NumToStr(V,1.0,False)+","+
"Open:"+NumToStr(O,1.3)+","+"High:"+NumToStr(H,1.3)+","+"Low:"+NumToStr(L,1.3)+","+"Close:"+NumToStr(C,1.3)+"\n"+
"Previous DateTime:"+NumToStr(Ref(DT,-1),formatDateTime)+"\n"+
"Selected DateTime:"+NumToStr(DT,formatDateTime)+"\n"+
" Next DateTime:"+NumToStr(Ref(DT,1),formatDateTime);

Edited by Al Venosa

A Real-Time Message FIFO

Real-time messages often appear on your screen only for the duration of a single chart-refresh interval and disappear before you have time to read them. The FIFO (First In First Out) n-line display presented here captures and scrolls messages in the chart Title so that they are easier to read. Logging messages to DebugView or the Interpretation window would require opening additional windows. Using the Title instead displays the messages right on the chart and is more space-efficient.

A typical application would be to display real-time system status, such as order status, TWS error messages, partial fills, account balance, profits, etc.

Since the chart Title does not support formatting, it is advisable to use a mono-spaced font, such as Lucida Console, and pad spaces to create columns. The integer part of the NumToStr() formatting parameter sets the overall length of the returned string and can be used to format columns. If you prefer more font and color options, you can use Gfx functions to display the messages.

To prevent Title wrapping, you can truncate messages using the StrLeft() function. This works well for TWS error messages that can be long but carry the important info at the left of the error message. The demo below uses a simple PadString() function to space short messages in columns.

The AddToFIFOTitle() function is called whenever you want to add a message to the table. Its first argument is the name of the static variable that contains the table, the second argument is the message you want to add to the table, and the third is the maximum number of lines in the table. Setting the third argument to zero clears the table.

To keep things simple, the code below uses Param functions to simulate real-time messages; in a real system, these messages would be generated by real-time events. To test the code, click any of the numbered Event Messages in the Parameter window.

clip_image002

The Title produced should look like this:

clip_image004

Note that messages in this example are padded to position the next column properly. The order of the messages is inverted to allow the last message to appear at the top of the message table. Whenever the maximum number of lines is exceeded, the oldest message is removed. To ensure that the table is updated at least once a second you should always include a RequestTimedRefresh(1) in your code.

Finally, in Automated Trading you don’t always need charts, and you may prefer to display only a status table. Since the table is stored in a global Static Variable, you can read the table from any pane or window using just two lines of code:

RequestTimedRefresh);
Title "\n"+StaticVarGetText("FIFOTitle");

If you use several scrolling displays in different panes, you should key the Static Variables as explained in Keying Static Variables. The complete demo code follows:

function padStringStringColWidth )
{
SpaceFill " ";
if( String == "{EMPTY}" String "";
SL StrLen(String);
NS StrLeft(SpaceFillColWidth-SL);
return string+NS;
}

function AddToFIFOTitleStrNameStrMaxItems )
{
// Add New item
NewString "";
PrevStr StaticVarGetTextStrName );
ItemCount Nz(StaticVarGet("NumberItems"));
if( MaxItems == )
{
StaticVarSetText(StrName"");
StaticVarSet("NumberItems",0);
S1 "";
}
else if( Str != "" )
{
StaticVarSet("NumberItems",++ItemCount);
NewTitle NumToStr(ItemCount,3.0,False)+". "+Str "\n"PrevStr;
for(s=0n=0S1=""; ( s2=StrMid(NewTitle,s,1) ) != "" AND &ltMaxItemss++ )
{
S1 S1 S2;
if( S2=="\n" n++;
}
}
else S1 PrevStr// come here when Str == ""
StaticVarSetText(StrNameS1);
return StaticVarGetText(StrName);
}

RequestTimedRefresh);
// Simulate Transient (Trigger) Events
Event1 ParamTrigger("Event Message 1""EVENT1");
Event2 ParamTrigger("Event Message 2""EVENT2");
// Simulate State events and convert to triggers
PrevEvent3 Nz(StaticVarGet("Event3") );
Event3 ParamToggle("Event Message 3""EVENT3OFF|EVENT3ON",0);
StaticVarSet("Event3",Event3);
Event3Trigger Event3 != PrevEvent3;
PrevEvent4 Nz(StaticVarGet("Event4") );
Event4 ParamToggle("Event Message 4""EVENT4OFF|EVENT4ON",0);
StaticVarSet("Event4",Event4);
Event4Trigger Event4 != PrevEvent4 ;
MaxEvents Param("Max. Number Events",5,0,20,1);
if( Event1 )
{
Msg1 PadString"EVENT1 MSG"15)+Now(2);
AddToFIFOTitle"FIFOTitle"MSG1MaxEvents );
}
if( Event2 )
{
Msg2 PadString"EVENT2 MSG"15)+Now(2);
AddToFIFOTitle"FIFOTitle"Msg2MaxEvents );
}
if( Event3Trigger )
{
Msg3 PadStringWriteIf(Event3,"E3-ON MSG","E3-OFF MSG"), 15)+Now(2);
AddToFIFOTitle"FIFOTitle"Msg3MaxEvents );
}
if( Event4Trigger )
{
Msg4 PadString(WriteIf(Event4,"EVENT4-ON MSG","EVENT4-OFF MSG"), 15)+Now(2);
AddToFIFOTitle"FIFOTitle"Msg4MaxEvents );
}
Title "\nFIFOTitle Demo\n\n"+AddToFIFOTitle"FIFOTitle"""MaxEvents);

Edited by Al Venosa

Introduction to Research and Exploration

All system designs are the result of extensive research, exploration, and trial and error experiments. Traditional research tends to build on already existing knowledge, while empirical testing tends to explore more of the unknown and can lead to interesting new solutions. This category will cover ideas and programs you might want to explore when you are looking for a new system.

Edited by Al venosa

Introduction to Real-Time System Design

Developing trading systems is a very personal activity, and opinions vary widely regarding what is the best approach. Most of the solutions presented here were developed by Herman van den Bergen. They may not be compatible with your personal preferences and you are encouraged to explore other alternatives more suited to your own trading style before deciding on a possible solution. To develop a Real-Time Automated Trading (RT/AT) system, you must have a trading system to automate. If you haven’t developed one yet, you may find some ideas in the Research and Exploration or Trading-Systems categories.

Modular design, readability, and simplicity of the system code are desirable to facilitate future maintenance. Posts in this category will progress through the various phases of developing a Real-Time Automated system.

Edited by Al Venosa

Introduction to Debugging AFL

Designing Automated-Trading systems can be complicated, and you can expect to spend a significant amount of time debugging your code. You will undoubtedly experience elusive problems that may be due to Internet delays, faulty data (such as low volume data spikes), orders that do not get processed, lack of volume, communication problems, etc. Such problems require you to know how to capture and display transient conditions, such as, for example, how orders are processed and acknowledged.

In real-time trading many events are not completed in a single AFL execution but in a sequence of small steps that are spread out over time and over many chart refreshes (AFL executions). This requires debugging techniques that are very different from EOD programming.

This category covers basic debugging techniques, such as: how to capture transient events, maintain a log, zero in on run-time bugs, display system variables, etc. Developing basic debugging techniques up front will save you significant time later.

Edited by Al venosa

Introduction to Real-Time Automated-Trading

Automated Trading of financial instruments is controversial and risky. Without exception, all code in this category is intended to demonstrate AFL programming techniques and not, under any circumstance, to place orders on your real-money trading account.

Code in this section has been developed using the latest versions of AmiBroker beta (4.96.0), the InteractiveBrokers Controller (1.1.1), and the TWS (873) as of this writing. If you experience execution problems, or AmiBroker gives you error messages, please verify that you are using the latest program versions before reporting bugs.

Unless stated otherwise, all programs are written to execute in an Indicator window. To run any of the examples, copy the code to the AFL editor and click Insert. To run programs that place orders on your paper trading or the eDemo account, the TWS must be open and connected to Interactive Brokers.

During initial testing, it is good practice to Insert the code in its own Pane under its own Chart-Tab, and activate only this window. This will prevent conflicts between static variables from different programs that may use the same name.

Most of the examples presented in this section are ready to copy, insert, and run. To give them this quality, peripheral code, like initializations, a trading system, and/or Title statement, had to be added. This makes the code a little longer but will give you a debugging start when applying the code and, at the same time, may expose you to some handy code snippets.

Edited by Al Venosa

Next Page »